
This post is the third part of our DSLR Photography 101 series. Also check out Part 1 – It’s Not the Camera, It’s You, Part 2 – F What? Understanding F Stops and Part 4 – How To Photograph Outdoor Sports.
Table of Contents
Be Aware of the Whole Picture – Composition
There are certain techniques you can use to compose a nice photo. The rule of thirds is a good place to start. Too many people just point the camera at the action and hope they get a successful image. The rule of thirds (vertical and horizontal) encourages you to divide the viewfinder into nine rectangles. You want your subject or the important part of the image to be on the outer corner of one of the inner rectangles.The advantages of this include having room to crop the image if you need to and it gives you a natural divide between your foreground and background.

Being aware of the background, the jar of dishwasher detergent was placed on the table for a product shot which allowed it to have a completely wooden backdrop. The image would have looked asque with walls or floor showing.
Try Different Techniques
Depending on what you’re taking a photo of, this technique will also allow you put something special in the background. For example, if your daughter wins a karate tournament and you want a photo to send to the proud grandparents, you can set up a trophy shot in this way. Have the dojo flag hanging in the background, use the rule of thirds to place your daughter on the left-most third of the viewfinder and have her hold the trophy around the right-most third.

Using the rule of thirds, the dog is proportioned diagonally from the bottom left to upper right of the photo. The frame is full but the eye is drawn to what is clearest, the dog’s head.
Don’t Forget Your Background
This also leads me to another point. Be aware of your background. Even seasoned-professionals mess this up from time to time. In the last post, we talked about using F-stops to blur your background. When this is not possible, make sure you look at the whole image through your viewfinder. Sometime you see telephone poles protruding trough peoples’ skulls in the picture. Sometimes you have a branch look like it is going through someone’s head from left to right. It could simply be an accident like in the background of your kids playing on the beach shot, you have someone else sunbathing. Nothing ruins a great photo like an eye-sore in the background. Once you notice it, your eye is attracted to it.

Background Techniques
One way to avoid bad backgrounds is to use the 360 degree technique. This is something one of my first newspaper editors taught me years ago. While it works better in newspaper-type photos of breaking news and action sports, it is something I still use to this day even for candid photos at home. Here is how it works. This is what she told me. Don’t get caught up in what is right in front of you. Yes you need to get a photo of what you see, but walk around the whole scene in a circle (360 degrees) and take photos from different angles. The photos may not always be better but you may get something tremendous because of the different perspective. For us at the newspaper, it was mostly at car accidents and house fires we would do this. But, I’ve also done it at hockey and football games, karate tournaments and even Christmas morning opening presents with my daughter. I took photos from five or six places around the room to capture her in different angles and to get different expressions on her face.
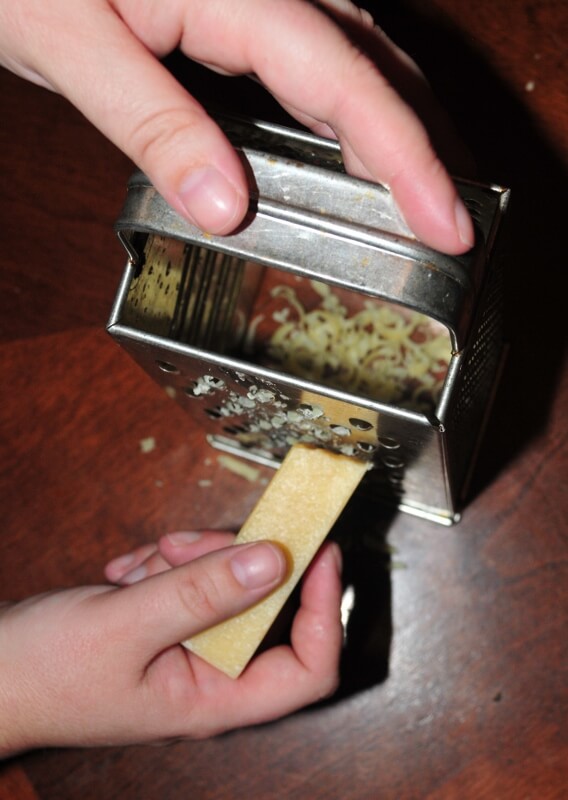
The block of soap is off-centre in this shot, leaning toward the right third of the frame. Each hand is along the horizontal thirds of the image, offering a framing quality to an image taken with the rule of thirds in mind.
More Techniques
While you are moving around, don’t be afraid to lay down, kneel, shoot at eye-level or stand over your subject. Some of my favourite photos of my daughter were taken at her toddler eye level and with me laying on the ground. She likes it when I come down to her level. I am convince she wants me to see the world from her eyes.
Snap Shots: Tips from a (former) pro
Whether you’re using a point and shoot camera, camera phone, or entry-level DSLR, try the burst shooting mode if it is available. I only ever use this setting with my Nikon D300. With burst mode, the camera will take anywhere from three to 10 photos in a second. The reason to use it is you often get different facial expressions from people so you have options to pick from. Especially in group shoots, it is tough to get everyone smiling and not blinking in the same shot. What do you do if you only take one shot of little Johnny blowing out his first birthday candles and it doesn’t take or isn’t in focus? You’re not shooting with film at $6 a roll and $10 for processing and printing. Digital photography is cheap. Take lots of photos and delete the one’s you don’t want later.
Great Tips! Pinned to my photography board for future reference too. My Nikon has a neat feature “3D tracking” used in burst mode it tracks my dog running across the yard or the kids running in basketball – it’s fantastic. I love how the new cameras are taking some of the guess work out of it.
These are all fantastic tips! I think a lot of people forget about composition when taking pictures. As part of my college program I am in a photography class, but have been dabbling with photography for many years before, and many of my classmates don’t seem to take the time to really think about the layout of their picture.