I’m a New England girl; imagine anything that represents Thanksgiving, and I’m surrounded by it, including flocks of wild turkeys.
I’ve even cooked a wild turkey, and it was a whole different experience, let me tell you.
However, up until last week, I expected to be spending Thanksgiving in California, so this project could be called “Mainer takes on San Diego”.

Table of Contents
3 Thanksgiving Crafts for a Turkey Tablescape
When I think of California, I think fresh produce, fresh flowers, beautiful weather, Mexican food.
Sounds like a picnic to me! So I planned several crafts around the idea of a #turkeytablescape.
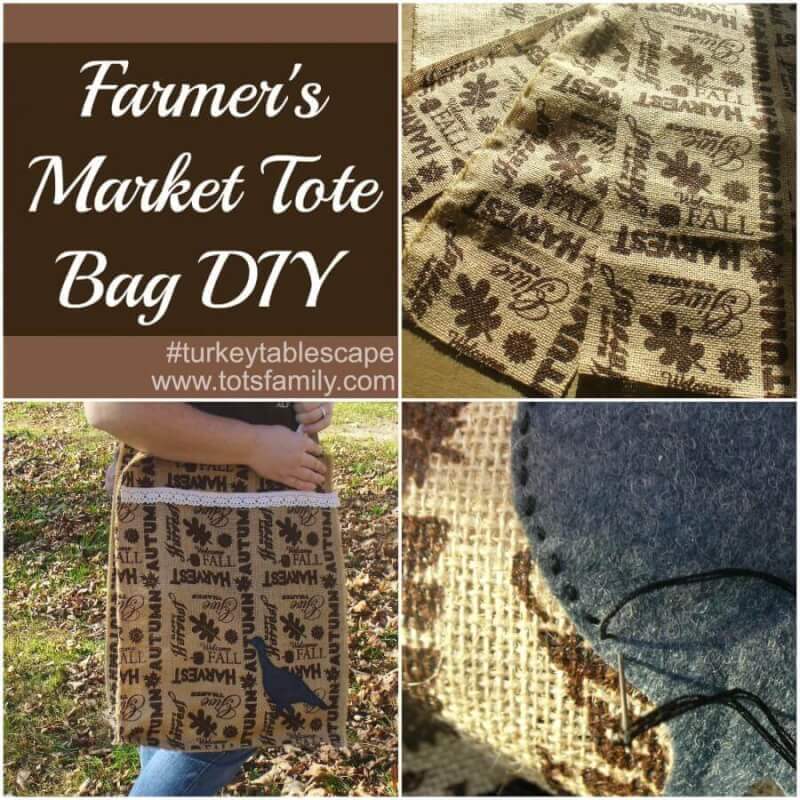
Before you can feast, you have to get the food, and for that, I made a market tote for taking to the farmer’s market.
Farmers Market Tote Bag Instructions:
1. Buy ½ yard burlap fabric. I went for one with a harvest theme print.
2. Cut turkey out of black or grey felt. I printed a turkey silhouette off of the internet for a pattern.
3. Sew turkey to front of bag. I hand-stitched using a plain running stitch.
4. Add trim to the front of the bag and handles. I used a pretty crochet-look lace trim, but I often use grosgrain ribbon for things like handles, as it is sturdier.
5. Cut the fabric into 2 15”x 17” rectangles for the front and back, 2 6”x 17.5” for the sides, and one 6”x16” for the bottom.
6. Sew the sides to the bottom along the short sides. I recommend pressing your seams. I sewed wrong sides together to expose the raw seam for a more rustic look. It depends how shabby you want your shabby chic to be…
7. Sew the sides and bottom to the front and back.
Voila—you are done.
You could, however, add a lining; I’m thinking unbleached muslin would be nice.
Just make the same bag slightly smaller, turn inside out, and sew to the top of the burlap bag.
You could also reinforce the seams with an extra row of stitching, top stitching, etc.
Burlap is very prone to unravel.
Maybe you’ll be able to pick up some flowers for your picnic table at the market, too.
For these, I added a turkey to four mini-vases.
I used white Martha Stewart Glitter Glue [love this stuff.]
Martha Stewart also has a product called “Frost Etching Effect” in the paint section at Jo-Ann that I think could be fun for this project.
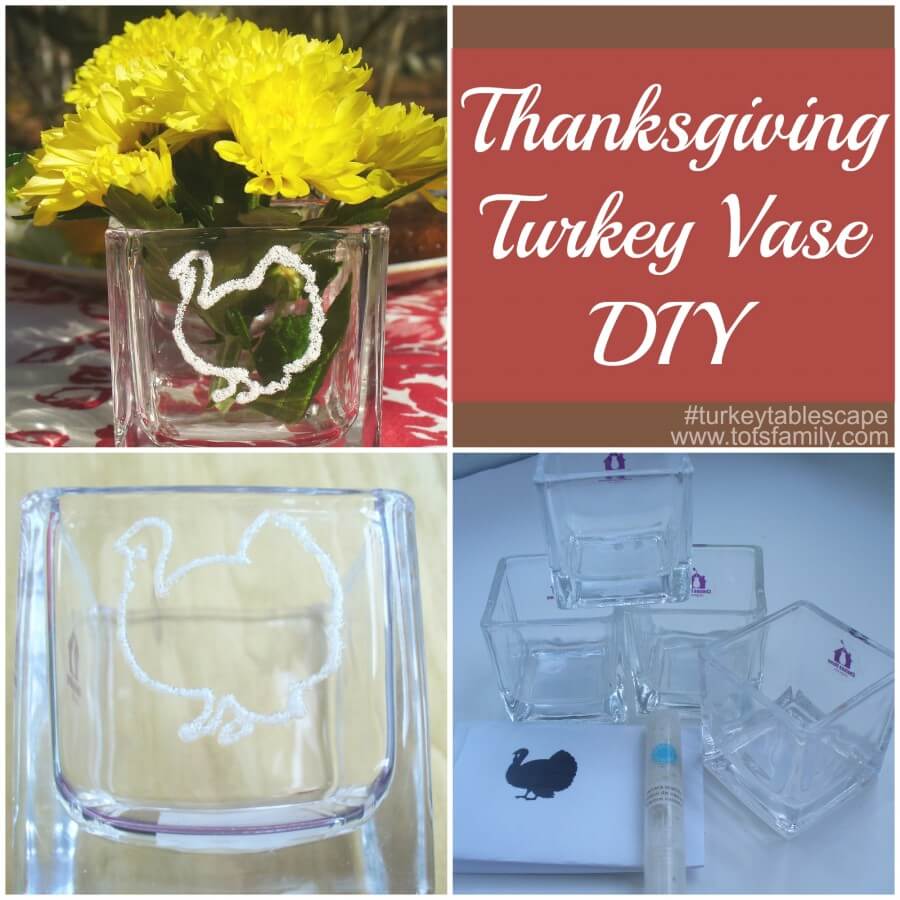
I love how easy this craft is, and with consistent results.
I just printed a turkey silhouette in the appropriate size, held it against the inside of the glass [you could use a little piece of tape], and traced it on the outside.
Easy peasy, and cute.
You might even be able to remove the glue to paint a Christmas tree next month, or paint something for a different holiday on each side.
Fun. 😀
Finally, I made a mini menu chalkboard to decorate your table:

Thanksgiving Mini Menu Board DIY
1. Paint [or stain] a wooden plaque in the color of your choice. I used a glittery gold. Let dry.
2. Trace or freehand a turkey silhouette onto the plaque in pencil.
3. [optional] Go over the pencil with a black Sharpie paint pen or even a black Sharpie marker. You don’t have to do this, but it makes it easier to get a neat edge.
4. Paint the silhouette with black chalkboard paint. Allow to dry at least an hour [I waited overnight.] Apply a second coat. Let cure at least 25 hours. Apply the paint as smoothly as possible.
5. Run a piece of chalk over the surface of the chalkboard, then erase. I did this a couple of times.
Now your menu is ready to use, adding the perfect touch of informal finesse to your table setting.
Happy Thanksgiving. 😀
Checkout these Thanksgiving articles – Thanksgiving Gratitude Turkey Craft, Thanksgiving Jokes for Kids and How to Rock at Planning Thanksgiving.
Love the glass etching! Too bad Canadian Thanksgiving has already come and gone!
So glad you all liked it! :]
These are cute! I like the menu board.
I love the turkey vase, such a cool idea!
The glass etching is so cool!
Here’s my fourth craft that I didn’t think was quite up to snuff: http://selkiemum.com/dont-diy-wine-charms/
You are so creative! I wish I was good at that. You do make it look easy 🙂
I love the turkey vase. I want one for my table!
Those are really cute crafts. I love the printed burlap bag – and the vase is so simple, but so cute.
I’ve been doing a lot of no-sew crafts this year – I frequent Jo-Ann quite often.
I love the vase and chalkboard. Thanks for sharing. Pinning these to make.
These are so cute!